


LAG/VLAN on Netgear Insight managed switches

Table of Contents
Introduction⌗
For my new house, I decided to build a baller home network. The goals: 10G to as many places as I could get it. Multiple load balanced Internet uplinks. All inter-connects at 20G. And it had to have remote cloud management from my phone. All this has to start with cabling and switches.
Some of the rooms did not have Ethernet ports, and had firewalls in the walls to prevent more lines being added, so I used 2.5G MoCA over coax to get network connectivity. The house fortunately had CAT6 already for the Ethernet drops. I added one more CAT6 Ethernet drop to my office and the garage, so I could do dual 10G LAG connections for a true 10G network backbone.
The Netgear Insight switches I’m using are MS510TXM ($500) and MS510TXUP ($750, same but with PoE). These have 4 ports of 10G, 4 ports of 2.5G, and 2 10G SFP+ ports we will use only for connecting to other switches. All the ports are multi-gig, so you can connect a 2.5G device into a 10G port and it will negotiate at 2.5G.
They’re super quiet for 10G managed switches, though I did put them in an enclosed, foam-padded rack in my office to make them quieter since their fans are audible. I’m planning to try to replace the fans on the ones in the living room to reduce the noise.
These switches support Netgear Cloud Insight, which means you can use a web browser or cellphone to remotely manage multiple switches in a super cool way. It costs about $500 for lifetime use of this feature for ~5 switches, which is a steal compared to competitors. They are American made and headquartered in San Jose, California.
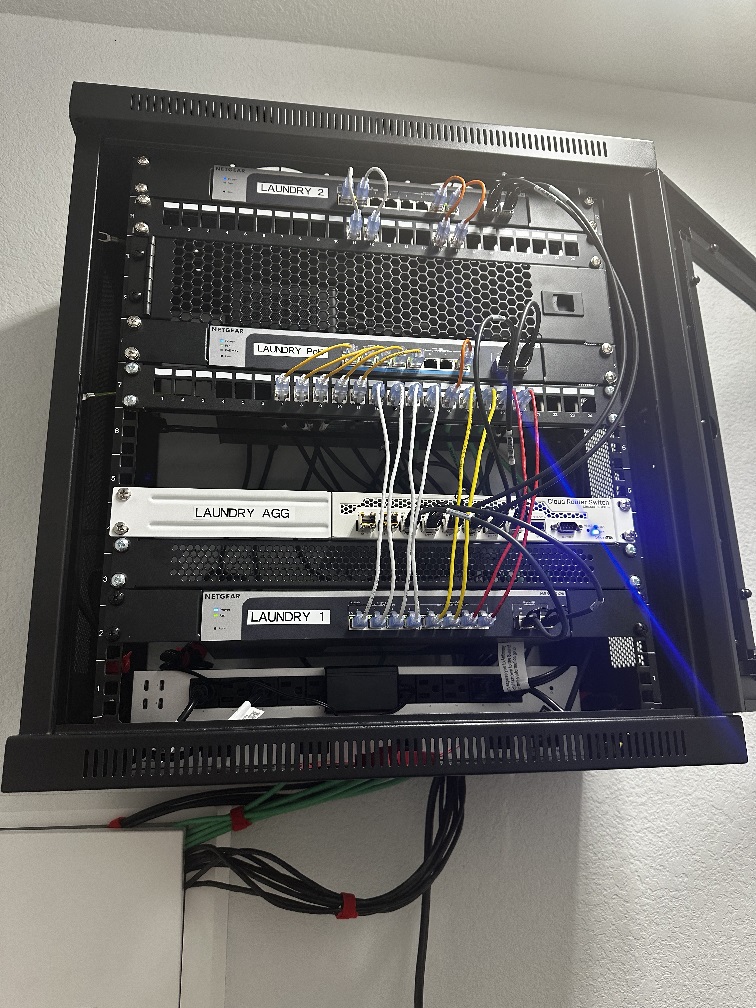
Central wall-hanging switch rack in the laundry room:
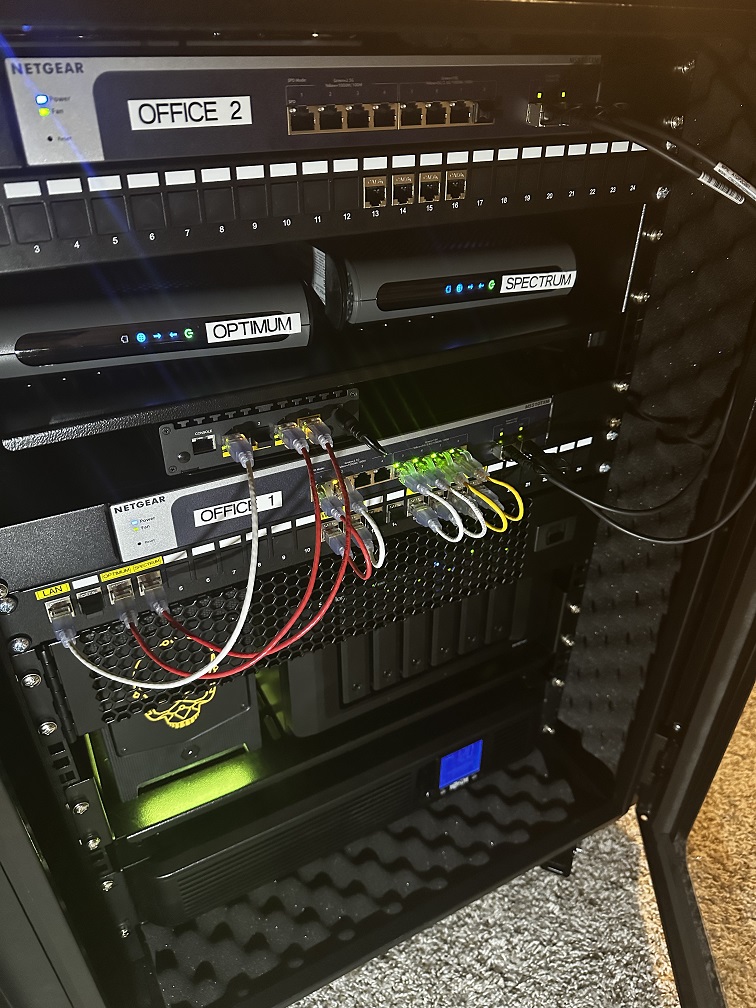
Office server rack:
Definitions and Motivation⌗
LAG: Link Aggregation. This is similar to load-balanced Dual WAN except between switches. You connect two cables instead of one, and the switch uses a hash of source/dest addresses to evenly distribute packets between the two links and evenly load them. You can remove a cable and it will instantly re-route to the other cable. I’m using this for bandwidth/performance rather than reliability reasons.
VLAN: Virtual Local Area Network (LAN). This allows you to save a lot of space and money by buying fewer switches to achieve efficient network separation between different types of devices. To implement VLAN they just add a header to the Ethernet frames, which indicates which VLAN the frames belong to. Since it’s in front of the frames, the VLAN processing can be done at full wirespeed. This is much more efficient than a lot of firewall rules, which would require all traffic to go through the firewall before making a hairpin turn back to the LAN.
To bridge between VLANs, the traffic must flow through the router. Imagine trying to send data at 10G between VLANs - It would need to traverse the network twice! For this reason, router/switch hardware needs to be as good as possible since it’s going to be doing a ton of work in some cases.
Practically people use VLANs to separate security cameras, IoT devices like TVs and printers, and Guest WiFi users, from the trusted devices on the network like your personal computer or network-attached storage (NAS). If you think through the types of devices that are separated here, it’s pretty rare that large transfers are happening between VLANs, so they are very efficient in practice.
Firewalla is the Router⌗
I’ve been using the Firewalla Gold Pro router/firewall, and I have to say it’s saved me an incredible amount of time. To configure it you can go through a cellular Internet connection from your phone rather than needing the LAN working at all points during setup. It made it much easier to make mistakes and learn how to configure things properly, since I was always able to hit the undo button via the phone. It supports everything you can imagine and more, with one-tap Wireguard VPN setup.
The only better option is a custom server PC running OPNsense/pfSense, but only marginally and with a lot more cost and effort. I’d recommend returning your router, whatever it is, and getting one of these. Don’t buy expensive consumer routers - They all suck, even the $1000 ones and the ones from Ubiquiti. Eero router does not support VLANs, for example.
While setting up the switches, I’d recommend adding one LAN network at first, and add the VLANs to the router after all the switches are configured.
WAP Setup⌗
If you are depending on your router for WiFi, then use a dedicated WAP instead. Ruckus R650 is my recommendation for WAP. I’ve heard good things about Netgear and Ubiquiti WAP as well, though my bet is the Ruckus ones are better. The configuration options on the Ruckus WAP are amazing, and they’re designed for huge enterprise installations so they have lots of cool mitigations for hidden node and other signal interference problems. I’m seeing consistent 1Gbps download speed test results from fast.com, sitting on the living room couch in the same room as the WAP, 500 Mbps in the garage, and 350 Mbps in the farthest guest room. If your WAP does not support VLANs, then it’s probably not worth using if you’re using VLANs for the rest of your network.
I’d recommend setting up a temporary WiFi network directly off the Firewalla/router while working on this stuff, since it helps regain access more quickly if anything goes wrong.
Planning⌗
I found it incredibly helpful to plan out how everything on the network would be connected in each room, down to which port was connected to which device. This guarateed that I could simulate the whole network in my office before installing the hardware around the house.
I’ve attached my network plan to the bottom of the blog post below to show what information is useful to collect before starting the setup.
Registering NETGEAR Devices⌗
I first stacked all the switches and plugged them all in, then connected them using single cables to simulate the network I was building.
I found it useful to write down the serial number and MAC address of all the NETGEAR devices. Before you set up VLANs, the NETGEAR Switch Discovery Tool can quickly identify the IP and MAC address of all the switches. It has a button to open a browser window for each switch, where you register them to your Netgear cloud account. The default switch password is “password”. I then set the same long random password (saved in a password manager) for each switch. Once logged in, I noted down the serial number in the web UI, verified it matched the back of each switch to make sure my IP/MAC/Serial table was correct. I immediately selected to manage the switch with Insight, and never went back to this web ui.
In the Insight app, I was then able to add the device. If the device shows up under “My Other Netgear devices” instead of the “Insight” category, just select it and delete it from your account, and then add it in manually with the MAC/serial number. It may help to reboot the switches to get them to show up in the cloud view faster.
To manage the devices, I prefer the web interface to the cellphone one. On my Windows PC, Chrome did not load the web interface (perhaps due to ad blocker?) so I use Edge instead: https://insight.netgear.com/ You can click the flask icon on the right to activate dark mode, which looks a lot better.
On my router, I assigned reserved IP addresses and hostnames for all the switches at this point, which made it easier to ping them later to test connections. On Windows I use the cmd.exe CLI and use e.g. ping -t garagepoe.lan to keep pinging the device continuously while testing.
It takes a bit for them all to firmware update, but this process is automated and just takes some patience. You can schedule synchronized firmware updates to happen on weekends so they don’t happen during normal use during the week.
Setting up STP⌗
To make this much less error-prone to set up, STP should be enabled on all the switches. This prevents the whole network from going down if you make a loop by accident.
Select All > Wired > Settings > Spanning Tree. Check Enable and use RSTP mode for faster STP. Scroll down the page and click [Select All] on all devices and LAGs. I believe the LAGs inherit this setting from the ports if you set them up later. Scroll to the bottom and hit [Save].
Setting up LAGs⌗
For all the inter-switch connections I wanted to set up dual 10G LAG, which turns out to be the first step. After setting up VLANs it’s a lot trickier to get those working since you have to undo all that VLAN config on the ports first.
Assuming we’re starting with default configured switches, you’ll need a spare Ethernet “cheat” cable to connect them while configuring the uplink ports. By default everything is set on VLAN 1 as an access port.
First unplug the actual inter-switch connection and plug in the cheat cable and verify the devices are still connected. Then in the web config go to Wired > Settings > LAG > (+) to add a new LAG. Select the two devices to bridge.
Pick a name and set PVID to 1.
What I’ve read is that Static is worse than LACP for LAGs, though I’m not sure about the details as to why. What I’ve noticed is that Ubiquiti products only support LACP and not Static when connected to NETGEAR switches, so in general I’d recommend unchecking the Static checkbox when setting up a LAG.
When bridging two NETGEAR switches, you’re done! You should be able to remove the cheat cable after a few seconds as the configuration applies very quickly. Then plug in the two cables for the LAG connection and experiment with a ping command to see how the network reacts to removing either one of the connections.
Setting up VLANs⌗
After all the LAGs are done, it’s time to set up the VLANs.
Navigate to All > Wired > Settings > VLAN/Network Setup.
Note there are some default VLANs configured like 4089 for “video.” Delete these unless you’re smarter than me. I tried them for carrying video and they do not work.
VLAN 1 (built-in): Management : Data : QoS=0 : Switches and WAP only.
VLAN 10: Trusted : Data : QoS=7 : Desktop PCs, laptops on WiFi, NAS, that sort of thing.
VLAN 42: IOT : Data : QoS=5 : Internet of Things, like Hue sync box, Apple TV, Google assistant, printers, most devices on the network.
VLAN 66: Guest : Data : QoS=1 : WiFi guests at the house.
VLAN 99: Cameras : Data : QoS=4 : Security cameras.
Larger QoS = Higher priority for this traffic.
VLAN 1 is the only one where DHCP client should be enabled, since we want the switches to get an IP assigned by the router on that VLAN. On all other VLANs, DHCP client should be set to None.
Setting up VLAN Trunks⌗
Similar to the LAG setup, I do this slowly and methodically with testing, since I’ve casually locked myself out several times doing this part. First, configure the VLAN tagging for LAGs and other connections between switches. Configure one connection at a time and test it before moving on. Configure the deepest switches in the network (away from the router) first, and move towards the router.
First remove your normal switch inter-connections, and install a cheat cable between each pair of switches you’ll be updating the VLAN rules on. Then after verifying the link works (by pinging the remote switch):
Navigate to All > Wired > Settings > VLAN/Network Setup > Select a VLAN > Port Members > (+) Expand.
You can select [Access Port] [Trunk Port] [Port Authentication Mode] and [Delete] here for each port on all devices.
Note that when you select a LAG, it should notify you “Lag X is selected.” I would do these one at a time to avoid any bugs in the web app, since it seems to be a bit of a special case.
WARNING: Only configure [Trunk Ports] at first - Get the switches connected before setting up any access ports! Don’t rush this part because it’s easy to lose access here.
Set all switch inter-connection ports to [Trunk Port].
IMPORTANT: You must set [Port Authentication Mode] to explicitly Authorized for all [Trunk Port]s. Also set [Port Authentication Mode] to explicitly Authorized for all your connected test devices on [Access Port]s. Since the default [Auto] authentication mode will actually be to disallow! This was very confusing to me and wasted many hours, and is not documented anywhere that I could find.
Make sure that all of the ports in LAG groups have the green checkmark, and repeat the [Port Authentication Mode] configuration again until they do. If they already have the green checkmark you don’t need to set the [Port Authentication Mode] again.
For my house, I contained all the security camera VLAN traffic within one switch, so I do not trunk that to any other switches. Also, Guest access is restricted to switch interconnects from the WAP to the router, but cannot traverse any other links. IoT, Trusted, and Management are all trunked everywhere.
Scroll down and select [Save]. Repeat for all VLANs.
After configuring each of the VLANs, remove the cheat cable and restore the normal cable and verify you can still ping the devices. If not, restore the cheat cable and double-check everything.
Then repeat this whole thing again for each switch interconnect, including setting up the cheat cable as a bypass.
It should be safe to set the uplink to your router as a trunk as well, since your router will be in LAN mode and it will ignore VLANs for now.
Things that can go wrong⌗
If during VLAN setup traffic suddenly stops routing and the lights are blinking weird on the rack, then you might have a multicast storm. This is usually caused by not having exactly synchronized VLAN settings on both sides of a trunk. To check this, you can look at the device logs and you should see the trunk port indicate a multicast storm error.
Setting up router VLANs⌗
Now you can set up the same VLANs in your router/firewall that you set up on the switches and configure any policies you want. One such policy would be disallowing the IoT VLAN from starting a connection with your Trusted VLAN.
If anything goes wrong, you can always go back to LAN mode on the router and then double-check the switch configurations.
Setting up VLAN Access Ports⌗
Now we can finally set up all the access ports across the whole network in one go based on the network plan we made back before buying any of the hardware. Since the trunks are all tested and working, no cheat cable is required.
To set up what ports can receive data from a VLAN:
Navigate to All > Wired > Settings > VLAN/Network Setup > Select a VLAN > Port Members > (+) Expand:
-
You should [Delete] any ports that should not receive data from this VLAN.
-
You should [Access Port] any ports that should receive data from this VLAN but do not understand VLAN tags, like anything that is not a switch or router or WAP. So this setting is for desktop PCs or NAS for example.
-
You must set [Port Authentication Mode] to explicitly Authorized for any ports that are [Access Port] or [Trunk]. A green checkbox should appear in the lower right of the port icon if it worked.
Click [Save].
To set up what ports can send data to a VLAN:
Navigate to All > Wired > Settings > Group Port Settings:
For each VLAN, select all the ports that are [Access Port]s on that VLAN on each device.
Select RADIUS Configuration > Port Configuration Mode = Authorized. I’m not sure if this is a separate setting from the above [Port Authentication Mode] but to be safe, I would set it in both places.
Set the Default VLAN (PVID) to the VLAN that this port will be on.
As an aside, I’d recommend leaving the Max Frame Size at 1500 so you don’t have to deal with IP fragmentation when sending data over the Internet.
Click [Save].
RADIUS/MAC/IP Filters⌗
I haven’t bothered setting this stuff up yet, but maybe once things settle on my network I’ll turn these on. Once thing I like about the Firewalla is that once the network has mostly settled you can enable a Quarantine mode that allows you to set access rules for any devices with unrecognized MAC addresses, and since VLANs are set up you can tell how the new device is connected to the network just by looking at which subnet its IP address is on.
This is just for my home network after all, so physical security is not a huge deal. The main concerns are setting good WiFi passwords and separating IoT/Guest devices from trusted devices.
Testing Performance⌗
A good test is to run ping for a while on each switch and check for latency spikes on the unloaded network. If you’re seeing lag spikes now, it’s only going to get worse.
I tested a little and found that the UniFi switch I had mixed in was causing some latency spikes, so I ended up returning it. I have formed an opinion at this point about UniFi products that you can read more about below.
Before testing throughput, I’d recommend at this point to install the switches in the house where they are ending up to check for any cabling issues. After they’re installed you can go to All > Devices and select a switch to inspect. Then, mouse-over each port to check if the ports are connected at the full, expected speed.
In my case I found that one of the RJ45 connections between rooms could only negotiate at 5G instead of 10G. This was fixed by replacing one of the cables along that path.
For performance testing, I prefer real-world tests like checking the fast.com Internet speed, downloading a game on Steam, or measuring read/write NAS performance. Note that a NAS is a good place to host a speed test webapp like LibreSpeed Speedtest.
My experience with NETGEAR competitors⌗
Feel free to skip my rant, but I had some trouble navigating the confusing landscape of managed switches. I have bias towards buying most of the switches from one vendor rather than mixing and matching, so that I can view them from one cloud portal. And I am less price-conscious than most people.
QNAP M2116P-2T2S-US has 2 10G ports, 2 SFP+ ports, and 16 2.5G PoE ports. No cloud management, and you wouldn’t want to use it since these are headquartered in Taiwan. So it has less 10G ports, but 2x the PoE ports, while costing just $150 more than the MS510TXUP. I wanted more 10G connectivity, and I wanted the remote management, so didn’t go with these. It doesn’t support link aggregation, which I was excited about. Its VLAN tagging is pretty limited in frustrating ways, requiring at least one port be dedicated to VLAN 1, so I ended up just putting all my devices on VLAN 1 instead of properly separating management from trusted devices. I used it for a few weeks and returned it.
CISCO CBS350 10Gx8 switch is not multi-gig, and also seems to have significantly worse 10G performance fully configured with VLANs. The CISCO switch is super loud and 2.5X more expensive. Cloud management has a minimum of 15 devices for $800/year. Compare to $10/year from NETGEAR. I used it for a few weeks and returned it.
Mikrotik products look a bit overpriced and finnicky to set up. They don’t have any 2.5G PoE switches yet, so aren’t ideal for my Ruckus R650 WAP, which has a 2.5G uplink. The most interesting 10G offering is the CRS312-4C+8XG-RM, which is $600, so $100 more than NETGEAR, and you still have to buy a bunch of $50 SFP+ transceivers if you want copper. That’s the hidden price with Mikrotik - The transceivers are a minefield of power/thermal and multi-gig compatibility issues. I’ve heard their switches get noisy under load to deal with the thermal issues. They do sell some 1G PoE switches that would be just fine for security cameras by themselves. NETGEAR stuff seems more “reliable”, better build quality, much less time to set up, it’s an American brand (now a benefit in 2023), and supports 2.5G PoE/multi-gig.
One 10G Mikrotik product really stands out however: The CRS309. For an aggregation switch it’s amazing value. No fan in it, so no need to worry about that. Since the configuration for this role is simple, the learning curve is not so steep. It’s got two processors instead of one in the CRS312, so it can do a bit of layer 3 work if needed, like maybe an IGMP proxy to get Sonos speakers working across VLANs. It has 8 SFP+ 10G ports, so it’s most comparable to the UniFi Switch Aggregation. And for that role it’s so much better value than the UniFi switch. I ended up using one of these to aggregate three Netgear switches on a rack. I absolutely love having one of these switches central to the network where the really detailed network statistics and tools add extra firepower that NETGEAR is lacking. You really don’t want to run 10G RJ45 transceivers on these, as without a fan they are going to overheat and throttle.
Ubiquiti/UniFi: I’ve tried one of their Switch Aggregation 10Gx4 with the Tamagochi on the side. Note that these only really support fiber or DAC but not RJ45 copper connections. Also I’m using their metered/switched PDU on both racks, though their app buries all the useful features many menus deep, and it requires setting up a special docker container on its subnet to control them. The PDUs have great prices and availability. None of the rest of their useful products are in stock anymore. However, the Switch Aggregation I ended up returning because during testing I noticed it was causing occasional huge 10+ms latency spikes just on the wired network. Replaced it with a Mikrotik CRS309-1G-8S+IN that does not have these issues.
So, I’m not a fan of UniFi brand for many reasons. They have production issues and cannot keep up with demand, leading to an exploitive grey market. They seem to prioritize aesthetics over functionality. UniFi Eero mesh routers are super overpriced and don’t support VLAN, and they encourage you to buy like 3 of them to cover your whole house+garage, while the Ruckus R650 is cheaper and can easily cover a whole house+garage. They try hard to sell you useless $200 “cloud key” devices you can self-host on your NAS in 30 minutes. Their routers are huge and expensive and perform worse than much cheaper products like Firewalla or free ones like OPNsense. So, they have a ton of “gotcha” products that should not exist, and it makes them seem very shady.
UniFi’s products are poorly documented in many ways. For example I bought the Switch Aggregation assuming I could put 8 copper transceivers on it, but it turns out only half of the ports can accept transceivers, which I only noticed after reading the specifications sheet twice and paying attention to the very fine print. There are lots of similar hidden suprises that should have been well documented so that people can plan their network on paper before actually buying and trying things, like how the Switch Aggregation can only do LAG on certain pairs of ports and so on. Like how the Switch Aggregation can only allow “All” VLANs but will not let you pick which ones make it through, and how it causes periodic 10ms latency spikes, which finally made me return it. I’ve heard the rest of their products have lots of other little landmines you can step on.
Finally they get you on the way out too: UniFi’s return policy has restocking fees if you open the box, and sometimes even if you don’t. They force you to ship via FedEx which in my area is like 10 miles away and means driving for an hour just to do a return. All other switches I tried were available on Amazon, which provided a “no questions asked” full refund and free pre-paid UPS shipping.
My Network Plan (For Reference)⌗
Office:

MS510TXM Office1
1: 2.5G = Firewalla (2.5 G) [Trunk]
2: 2.5G = OfficePDU (100M) [Access: VLAN Management]
3: 2.5G = [Disabled]
4: 2.5G = [Disabled]
5: 10G = PC (10 G) [Access: VLAN Trusted]
6: 10G = NAS (10 G) [Access: VLAN Trusted]
7: 10G = Laundry1 (10G LAG) [Trunk]
8: 10G = Laundry1 (10G LAG) [Trunk]
9:  SFP+ = Office2 (10G LAG) [Trunk]
10: SFP+ = Office2 (10G LAG) [Trunk]

MS510TXM Office2
1: 2.5G = Test Port [Access: VLAN Management]
2: 2.5G = Test Port [Access: VLAN Trusted]
3: 2.5G = Test Port [Access: VLAN IOT]
4: 2.5G = Test Port [Access: VLAN Guest]
5: 10G = [Disabled]
6: 10G = [Disabled]
7: 10G = [Disabled]
8: 10G = [Disabled]
9:  SFP+ = Office1 (10G LAG) [Trunk]
10: SFP+ = Office1 (10G LAG) [Trunk]


Laundry:

MS510TXM Laundry1
1: 2.5G = Guest1 (2.5G MoCA) [Access: VLAN Trusted]
2: 2.5G = Guest2 (2.5G MoCA) [Access: VLAN Trusted]
3: 2.5G = Street (2.5G MoCA) [Trunk]
4: 2.5G = Security NUC (2.5G) [Access: VLAN Trusted]
5: 10G = Janet Room (10G) [Access: VLAN Trusted]
6: 10G = Media (10G) [Trunk]
7: 10G = Office1 (10G LAG) [Trunk]
8: 10G = Office1 (10G LAG) [Trunk]
9:  SFP+ = Aggregate (10G LAG) [Trunk]
10: SFP+ = Aggregate (10G LAG) [Trunk]

MS510TXUP LaundryPoE
1: 2.5G PoE = Camera1 (100M PoE) [Access: VLAN Video]
2: 2.5G PoE = Camera2 (100M PoE) [Access: VLAN Video]
3: 2.5G PoE = Camera3 (100M PoE) [Access: VLAN Video]
4: 2.5G PoE = Camera4 (100M PoE) [Access: VLAN Video]
5: 10G PoE = Office Camera NUC (2.5G) [Access: VLAN Video]
6: 10G PoE = [Disabled]
7: 10G PoE = [Disabled]
8: 10G PoE = WAP (2.5G PoE) [Trunk]
9:  SFP+ = Aggregate (10G LAG) [Trunk]
10: SFP+ = Aggregate (10G LAG) [Trunk]

MS510TXM Laundry2
1: 2.5G = Master Bedroom (100M) [Access: VLAN IOT]
2: 2.5G = LaundryPDU (100M) [Access: VLAN Management]
3: 2.5G = [Disabled]
4: 2.5G = [Disabled]
5: 10G = [Disabled]
6: 10G = [Disabled]
7: 10G = Garage (10G LAG) [Trunk]
8: 10G = Garage (10G LAG) [Trunk]
9:  SFP+ = Aggregate (10G LAG) [Trunk]
10: SFP+ = Aggregate (10G LAG) [Trunk]

These are all aggregated by a Mikrotik CRS309-1G-8S+IN using DAC patch cables.


Garage:

MS510TXUP GaragePoE
1: 2.5G PoE = Laser (1G) [Access: VLAN Trusted]
2: 2.5G PoE = Mario (1G) [Access: VLAN Trusted]
3: 2.5G PoE = Luigi (1G) [Access: VLAN Trusted]
4: 2.5G PoE = Camera5 Garage (100M PoE) [Access: VLAN Video]
5: 10G PoE = [Disabled]
6: 10G PoE = [Disabled]
7: 10G PoE = Laundry (10G LAG) [Trunk]
8: 10G PoE = Laundry (10G LAG) [Trunk]
9:  SFP+ = [Disabled]
10: SFP+ = [Disabled]


Living Room:

MS510TXM Media
1: 2.5G = Marantz (1G) [Access: VLAN IOT]
2: 2.5G = Smartwings (1G) [Access: VLAN IOT]
3: 2.5G = Hue (1G) [Access: VLAN IOT]
4: 2.5G = ? [Access: VLAN IOT]
5: 10G = Apple TV (1G) [Access: VLAN IOT]
6: 10G = PS5 (1G) [Access: VLAN IOT]
7: 10G = ? [Access: VLAN IOT]
8: 10G = Laundry1 (10G) [Trunk]
9:  SFP+ = [Disabled]
10: SFP+ = [Disabled]


Street Guest:

MS510TXM Street
1: 2.5G = MoCA (2.5G) [Trunk]
2: 2.5G = Cannon Printer (1G) [Access: VLAN IOT]
3: 2.5G = Laser Printer (1G) [Access: VLAN IOT]
4: 2.5G = GPU1 PC (2.5G) [Access: VLAN Trusted]
5: 10G = [Disabled]
6: 10G = [Disabled]
7: 10G = [Disabled]
8: 10G = [Disabled]
9:  SFP+ = [Disabled]
10: SFP+ = [Disabled]