


AI on Jetson Orin

Table of Contents
Jetson Orin⌗
The Jetson Orin is a new series of SBCs from Nvidia that is designed for autonomous vehicles. The high end of the line is the AGX Orin 64GB, with 12 CPU cores and 61.3GB unified GPU/CPU RAM, achieving 275 TOPS performance for AI. The low end is the Orin Nano, with 6 CPU cores and 7.16GB unified GPU/CPU RAM, achieving 40 TOPS performance for AI. This is a really interesting product line because you can get a lot of compute in a size similar to a cellphone. The latest iPhone 14 Pro Max provides 17 TOPS performance for AI, while costing much more than the Orin Nano.
Jeton Orin Nano 8GB Developer Kit: https://www.seeedstudio.com/NVIDIAr-Jetson-Orintm-Nano-Developer-Kit-p-5617.html
Jetson AGX Orin 64GB Developer Kit: https://www.arrow.com/en/products/945-13730-0050-000/nvidia (Currently out of stock) - I found one on eBay with a $200 markup.
I added a 4 TB m.2 drive to both developer kits so we are not running off the slow internal eMMC drive, which is as easy as unscrewing the retention screw, inserting the drive, and screwing the retention screw back in.
Note that you probably will want to be able to attach a monitor to these devices, and they only support DisplayPort which is uncommon for portable monitors. I’d recommend getting a DisplayPort to HDMI adapter; in my case I had one lying around.
For Speech-to-Text and Text-to-Speech experiments, I also picked up a Yealink CP900. The CP900 is a quality USB speaker/microphone. So far I’ve only tested the speaker with some Internet radio, and it sounds like it should work really well for a voice assistant.
For large language models, the best way to get the best performance out of this platform is to use HuggingFace Optimum: https://github.com/huggingface/optimum
Optimum is a set of tools that helps optimize existing models for use on more constrained devices than Nvidia GPUs. For example, Optimum can convert a PyTorch model to ONNX, and then optimize the ONNX model for use on a Jetson Orin. The result is a model that is much smaller and faster than the original model, but with only a small loss in accuracy. It also fully supports Intel Neural Compressor and OpenVINO for Intel iGPU/VPU acceleration.
Let’s figure out how to get Optimum working on the Jetson Orin!
Flashing: Host Machine Setup⌗
To flash these devices you’ll need an Ubuntu 20.04 host machine. At work I’ve used a VM to run this older version of Ubuntu on Ubuntu 22.10, though it’s not officially supported. For bringing these up, I installed Ubuntu 20.04 on a spare laptop and gave it an ethernet cable to speed up downloading all the packages.
Then on the host machine you’ll need to install the Jetson SDK Manager: https://developer.nvidia.com/sdk-manager
This requires an Nvidia developer account, which is free.
Flashing: Target⌗
Now that we have the SDK Manager installed, we can flash the system software and developer tools on both devices.
The Jetson Orin Nano can be put in recovery mode by jumpering the recovery pins on the daughter board. Plugging in the barrel connector for power will get running in recovery mode. Then, attach a USB-C cable to the port on the right, and the host side goes into the SDK Manager host machine.
The Jetson AGX Orin can be put in recovery mode by holding down the middle button while plugging in the USBC power cable. The opposite side has a USBC data cable you can connect to the SDK Manager host machine.
The SDK Manager should detect the device type but you’ll still need to select the specific device model. I elected to install everything. It proceeds to download all the files to the host machine, then creates a filesystem image on the host machine, and finally it will pop up a programming dialog. The defaults are to send most of the files over Ethernet, but it’s much simpler and not too much slower to just select the USB option for all the files and ignore the Ethernet option. You’ll need to set a username and password.
Extra Jetson Setup Info⌗
For my setup, I plugged in a keyboard, mouse, and monitor to edit /etc/hostname and configure the hostname of the device. I also used the desktop interface to select MAXN mode for the AGX Orin. The Nano is already in 15W mode by default so it’s good to go. After rebooting, I set my firewall up to assign static IPs to both devices and assign appropriate hostnames for SSH.
And that’s it - We now have Orin Nano and Orin AGX lab devices ready for experimentation from the comfort of our desktop.
No more need for an attached keyboard, mouse or monitor from here on out.
The Orin Nano supports 1 Gbps Ethernet, while the AGX Orin supports 10G Ethernet, which is really nice for transferring large model files. If you want more info about 10G LAN, check out my blog post on the topic: https://catid.io/posts/netgear_insight/
As far as SSH clients go, I’m using Tabby.sh which supports a tabbed interface to multiple SSH sessions, which is really useful at my place where I have over 10 sessions up at a time these days. Visual Studio Code has a Remote Development extension that is my go-to for heavier editing tasks on the remote device. For sending files, I prefer using scp from git bash on Windows, or FileZilla when sending many files at a time.
Unlike a desktop GPU Linux setup, you’ll use some new tools to monitor the system. These replace nvidia-smi:
catid@orin:~$ sudo jetson_clocks --show
SOC family:tegra234  Machine:Jetson AGX Orin
Online CPUs: 0-11
cpu0: Online=1 Governor=schedutil MinFreq=729600 MaxFreq=2201600 CurrentFreq=2201600 IdleStates: WFI=1 c7=1
cpu1: Online=1 Governor=schedutil MinFreq=729600 MaxFreq=2201600 CurrentFreq=2201600 IdleStates: WFI=1 c7=1
cpu10: Online=1 Governor=schedutil MinFreq=729600 MaxFreq=2201600 CurrentFreq=1113600 IdleStates: WFI=1 c7=1
cpu11: Online=1 Governor=schedutil MinFreq=729600 MaxFreq=2201600 CurrentFreq=1113600 IdleStates: WFI=1 c7=1
cpu2: Online=1 Governor=schedutil MinFreq=729600 MaxFreq=2201600 CurrentFreq=2201600 IdleStates: WFI=1 c7=1
cpu3: Online=1 Governor=schedutil MinFreq=729600 MaxFreq=2201600 CurrentFreq=1190400 IdleStates: WFI=1 c7=1
cpu4: Online=1 Governor=schedutil MinFreq=729600 MaxFreq=2201600 CurrentFreq=2201600 IdleStates: WFI=1 c7=1
cpu5: Online=1 Governor=schedutil MinFreq=729600 MaxFreq=2201600 CurrentFreq=2201600 IdleStates: WFI=1 c7=1
cpu6: Online=1 Governor=schedutil MinFreq=729600 MaxFreq=2201600 CurrentFreq=2188800 IdleStates: WFI=1 c7=1
cpu7: Online=1 Governor=schedutil MinFreq=729600 MaxFreq=2201600 CurrentFreq=2112000 IdleStates: WFI=1 c7=1
cpu8: Online=1 Governor=schedutil MinFreq=729600 MaxFreq=2201600 CurrentFreq=2201600 IdleStates: WFI=1 c7=1
cpu9: Online=1 Governor=schedutil MinFreq=729600 MaxFreq=2201600 CurrentFreq=1190400 IdleStates: WFI=1 c7=1
GPU MinFreq=306000000 MaxFreq=1300500000 CurrentFreq=306000000
EMC MinFreq=204000000 MaxFreq=3199000000 CurrentFreq=2133000000 FreqOverride=0
DLA0_CORE:   Online=1 MinFreq=0 MaxFreq=1600000000 CurrentFreq=1600000000
DLA0_FALCON: Online=1 MinFreq=0 MaxFreq=844800000 CurrentFreq=844800000
DLA1_CORE:   Online=1 MinFreq=0 MaxFreq=1600000000 CurrentFreq=1600000000
DLA1_FALCON: Online=1 MinFreq=0 MaxFreq=844800000 CurrentFreq=844800000
PVA0_VPS0: Online=1 MinFreq=0 MaxFreq=1152000000 CurrentFreq=1152000000
PVA0_AXI:  Online=1 MinFreq=0 MaxFreq=832000000 CurrentFreq=832000000
FAN Dynamic Speed control=active hwmon2_pwm1=55
NV Power Mode: MAXN

catid@orin:~$ sudo tegrastats
04-24-2023 00:01:24 RAM 1282/62795MB (lfb 15152x4MB) SWAP 0/31398MB (cached 0MB) CPU [0%@729,0%@729,0%@729,0%@729,0%@729,0%@729,0%@729,0%@729,0%@729,0%@729,0%@729,0%@729] EMC_FREQ 0%@2133 GR3D_FREQ 0%@0 GR3D2_FREQ 0%@0 VIC_FREQ 729 APE 174 CV0@-256C [email protected] Tboard@32C [email protected] [email protected] [email protected] CV1@-256C GPU@-256C [email protected] [email protected] CV2@-256C VDD_GPU_SOC 2399mW/2399mW VDD_CPU_CV 400mW/400mW VIN_SYS_5V0 4032mW/4032mW NC 0mW/0mW VDDQ_VDD2_1V8AO 301mW/301mW NC 0mW/0mW
You can also use htop to view CPU/RAM usage like on normal Linux servers.
For this application it’s probably a good idea to set up a large swapfile, since we are going to be working with some large model files. The Jetson system image doesn’t have a swap file by default. I’d only recommend doing this if you installed an nVME m.2 drive. This can be done just like on normal Linux servers. I gloss over the details here as this is well documented elsewhere:
- Create a new swapfile with
sudo fallocate -l 128G /swapfile - Set permissions with
sudo chmod 600 /swapfile - Create the swap space with
sudo mkswap /swapfile - Enable the swap space with
sudo swapon /swapfile - Add the swapfile to
/etc/fstabwithsudo nano /etc/fstaband add the line/swapfile swap swap defaults 0 0
It should then show up in the output of htop as a swap file.
I like to add some tmux config changes to ~/.tmux.conf to enable mouse scrolling and pane selection and to increase the scrollback buffer size. This is optional but I find it makes the terminal much more usable:
set -g history-limit 24096
setw -g mouse on
Setting up PyTorch⌗
To make these devices useful for running AI models, we’ll want to get PyTorch installed. This part covers all the software configuration to get both devices running PyTorch.
First install some pre-requisites.
sudo apt install tmux htop tree curl git git-lfs
The documentation for getting PyTorch running is here: https://docs.nvidia.com/deeplearning/frameworks/install-pytorch-jetson-platform/index.html
Currently that works out to these commands:
sudo apt-get -y update

sudo apt-get -y install autoconf bc build-essential g++-8 gcc-8 clang-8 lld-8 gettext-base gfortran-8 iputils-ping libbz2-dev libc++-dev libcgal-dev libffi-dev libfreetype6-dev libhdf5-dev libjpeg-dev liblzma-dev libncurses5-dev libncursesw5-dev libpng-dev libreadline-dev libssl-dev libsqlite3-dev libxml2-dev libxslt-dev locales moreutils openssl python-openssl rsync scons python3-pip libopenblas-dev

export TORCH_INSTALL=https://developer.download.nvidia.cn/compute/redist/jp/v51/pytorch/torch-1.14.0a0+44dac51c.nv23.02-cp38-cp38-linux_aarch64.whl

python3 -m pip install --upgrade pip

python3 -m pip install aiohttp numpy=='1.19.4' scipy=='1.5.3'

export "LD_LIBRARY_PATH=/usr/lib/llvm-8/lib:$LD_LIBRARY_PATH"

python3 -m pip install --upgrade protobuf
python3 -m pip install --no-cache $TORCH_INSTALL
There are some warnings but it completes and gets you a copy of PyTorch 2.0 installed.
Notes About TensorRT⌗
On the Jetson platform, the only way to get full performance for AI acceleration is by using the TensorRT API. This was verified with benchmarks here: https://www.nebuly.com/blog/pytorch-2-0-inference-performance
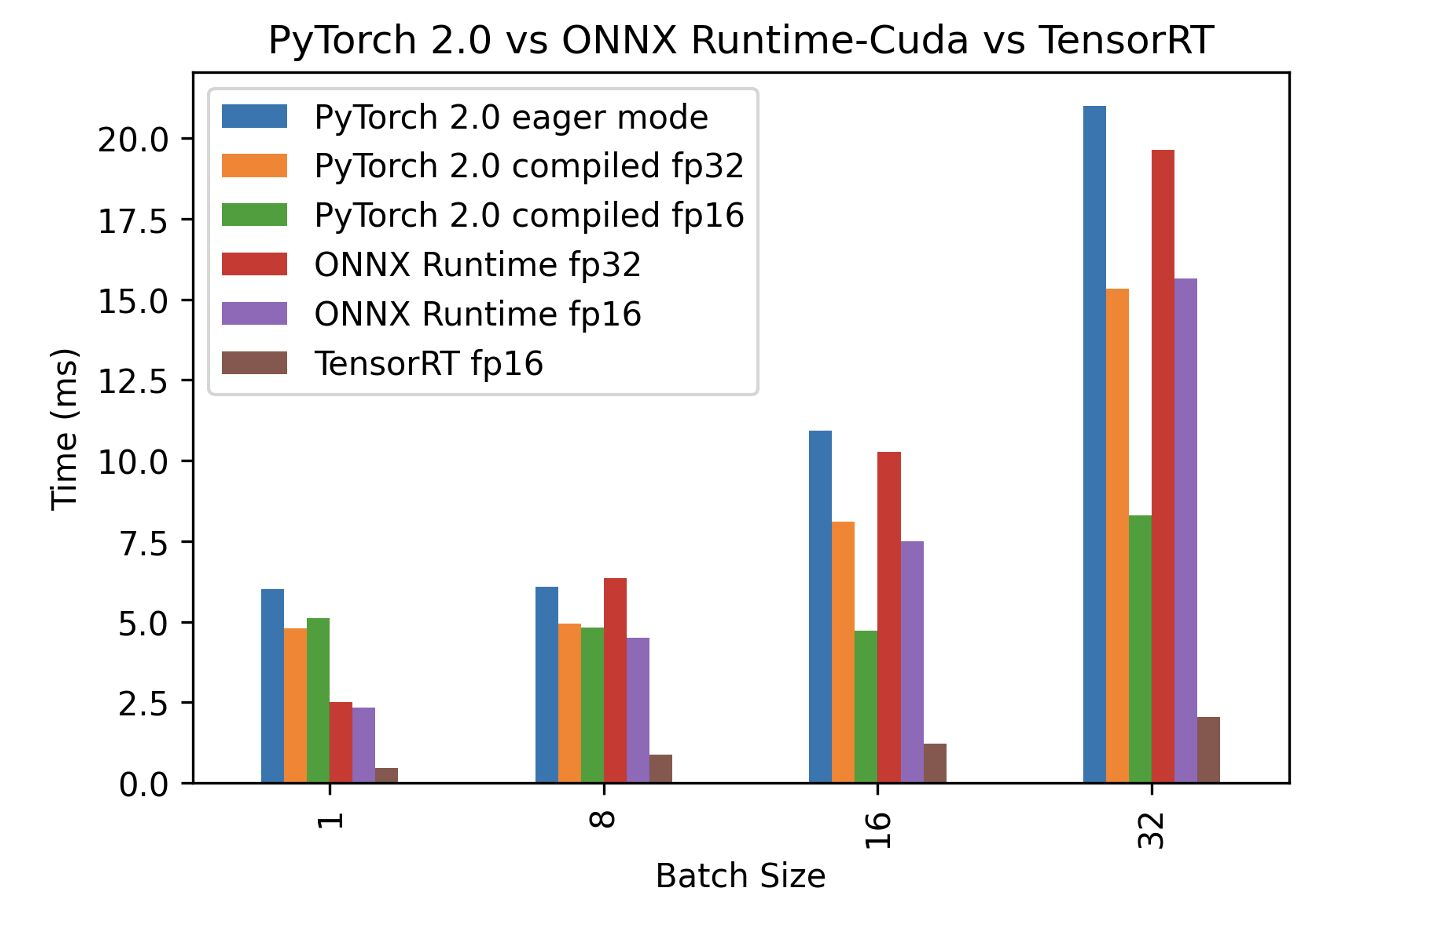
Note that 8-bit performance is much higher than FP16 as there is dedicated INT8 Deep Learning Accelerator hardware on the Jetson platform. So quantized models are going to perform the best.
Setting up HuggingFace Optimum⌗
We will want to get Optimum installed on both devices, which as mentioned earlier is useful for optimizing models to run as fast as possible on the Jetson Orin platform.
Optimum is based on the ONNX runtime, so we’ll need to install that first.
Some dependencies to install:
sudo apt install cuda
python3 -m pip install --upgrade protobuf==3.20.2
The documentation for installing ONNX runtime: https://onnxruntime.ai/docs/build/eps.html#nvidia-jetson-tx1tx2nanoxavier
You have to install this from source because the latest JetPack release is not available yet as a pre-built wheel.
Their documentation recommends installing libpython 3.6 but 3.8 is the one to use:
sudo apt install -y --no-install-recommends \
   build-essential software-properties-common libopenblas-dev \
   libpython3.8-dev python3-pip python3-dev python3-setuptools python3-wheel
You’ll need the latest Linux aarch64 .sh script to install CMake here: https://cmake.org/download/ and then run it:
wget https://github.com/Kitware/CMake/releases/download/v3.26.3/cmake-3.26.3-linux-aarch64.sh
chmod +x cmake-3.26.3-linux-aarch64.sh
sudo ./cmake-3.26.3-linux-aarch64.sh --prefix=/usr/local/ --skip-license
This will actually overwrite a previously installed version of cmake, which you can check with cmake --version.
Now we need to build and install the Python wheel for ONNX runtime. This takes a very long time even on the AGX Orin, so set it and maybe check it the next day:
git clone https://github.com/microsoft/onnxruntime
cd onnxruntime
git checkout v1.14.1
git submodule update --init --recursive

./build.sh --config Release --update --build --parallel --build_wheel \
 --use_tensorrt --cuda_home /usr/local/cuda --cudnn_home /usr/lib/aarch64-linux-gnu \
 --tensorrt_home /usr/lib/aarch64-linux-gnu
After the build completes:
catid@orin:~/sources/onnxruntime$ find . -iname \*.whl
./build/Linux/Release/dist/onnxruntime_gpu-1.14.1-cp38-cp38-linux_aarch64.whl

catid@orin:~/sources/onnxruntime$ python3 -m pip install --force-reinstall ./build/Linux/Release/dist/onnxruntime_gpu-1.14.1-cp38-cp38-linux_aarch64.whl

...
Successfully installed onnxruntime-gpu-1.14.1
If you need to, remove the CPU version of ONNX runtime:
python3 -m pip uninstall onnxruntime
Now we should be good to install Optimum.
The documentation for Optimum is here: https://github.com/huggingface/optimum
The latest code fixes some bugs:
python3 -m pip install --force-reinstall git+https://github.com/huggingface/optimum.git#egg=optimum[onnxruntime-gpu]
Upgrade two packages to resolve some errors that I encountered:
python3 -m pip install numpy=='1.23.1'
pip3 install --upgrade requests
Exit the shell and re-log here to get pip packages into the path.
Test HuggingFace Optimum⌗
Finally let’s test to make sure that Optimum and ONNX runtime are working properly.
Create a new bert.py file:
import onnxruntime
from transformers import AutoTokenizer
from optimum.onnxruntime import ORTModelForSequenceClassification

session_options = onnxruntime.SessionOptions()
session_options.graph_optimization_level = onnxruntime.GraphOptimizationLevel.ORT_DISABLE_ALL

tokenizer = AutoTokenizer.from_pretrained("fxmarty/distilbert-base-uncased-sst2-onnx-int8-for-tensorrt")
ort_model = ORTModelForSequenceClassification.from_pretrained(
    "fxmarty/distilbert-base-uncased-sst2-onnx-int8-for-tensorrt",
    provider="TensorrtExecutionProvider",
    session_options=session_options,
    provider_options={"trt_int8_enable": True},
)

inp = tokenizer("TensorRT is a bit painful to use, but at the end of day it runs smoothly and blazingly fast!", return_tensors="np")

res = ort_model(**inp)

print(res)
print(ort_model.config.id2label[res.logits[0].argmax()])
# SequenceClassifierOutput(loss=None, logits=array([[-0.545066 ,  0.5609764]], dtype=float32), hidden_states=None, attentions=None)
# POSITIVE
Run the script:
python3 bert.py
If this runs successfully, then you’re good to go!
Convert a Model⌗
There are more usage examples documented here: https://huggingface.co/docs/optimum/onnxruntime/usage_guides/gpu
You can also take a look at the main repo README: https://github.com/huggingface/optimum
In particular, they demonstrate using optimum-cli onnxruntime quantize to quantize a model to INT8 precision. Just replace the --avx512 line with --tensorrt like this:
optimum-cli export onnx -m deepset/roberta-base-squad2 --optimize O2 roberta_base_qa_onnx

optimum-cli onnxruntime quantize \
  --tensorrt \
  --onnx_model roberta_base_qa_onnx \
  -o quantized_roberta_base_qa_onnx
The README provides an example Python script that can be used to test the model:
from transformers import AutoTokenizer
from optimum.onnxruntime import ORTModelForQuestionAnswering

model_name = "roberta_base_qa_onnx"
tokenizer = AutoTokenizer.from_pretrained(model_name)
ort_model = ORTModelForQuestionAnswering.from_pretrained(model_name)

question = "What's Optimum?"
text = "Optimum is an awesome library everyone should use!"
inputs = tokenizer(question, text, return_tensors="pt")

# Run with ONNX Runtime.
outputs = ort_model(**inputs)

answer_start_index = outputs.start_logits.argmax()
answer_end_index = outputs.end_logits.argmax()

predict_answer_tokens = inputs.input_ids[0, answer_start_index : answer_end_index + 1]
answer = tokenizer.decode(predict_answer_tokens, skip_special_tokens=True)

print(question)
print(answer)